
Better shadow performance on views
There are two different uses for the shadowPath property on CALayer:
- Improving the performance of having a shadow
- Creating shadows that don’t match the contents of the view. Check out Apple’s Using Shadow Path for Special Effects.
For performance reasons, always set a shadowPath. This is a substantial improvement, especially if the view changes position via animation or presence in a scroll view.
When you can set a path
The shadowPath tells the system what should be casting a shadow without having to look at the contents of the view itself. Since most views that need a shadow are opaque, we just need to describe the appearance of the background of the view.
Using the convenience initializers on UIBezierPath we can create ovals, squares and rounded rectangles without difficulty. For more complicated paths, check out A Primer on Bézier Curves. You can still use UIBezierPath or CGPath to create them, but it will require more complicated math.
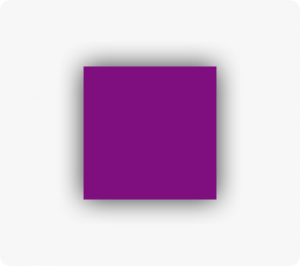
Starting with a simple, purple view with a shadow:
let purpleView = UIView()
purpleView.backgroundColor = .purple
purpleView.layer.shadowRadius = 10.0
purpleView.layer.shadowColor = UIColor.black.cgColor
purpleView.layer.shadowOffset = CGSize()
purpleView.layer.shadowOpacity = 0.8
We can tell the system to draw a shadow for the entire square:
purpleView.layer.shadowPath = UIBezierPath(rect: purpleView.bounds).cgPath
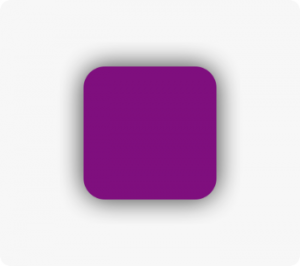
For rounded corners, we can set the cornerRadius property on the layer, and create a matching shadowPath:
purpleView.layer.cornerRadius = 16.0
purpleView.layer.shadowPath = UIBezierPath(roundedRect: view.bounds, cornerRadius: 16.0).cgPath
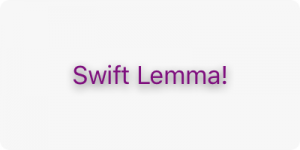
When you can’t set a path
Sometimes it’s not possible to set a path because there’s no easy way to describe the contents of the view. For example, text is a mess of random contents. Rasterizing the layer avoids having to draw the shadow repeatedly.
// create our label
let label = UILabel()
label.textColor = .purple
label.text = NSLocalizedString("Swift Lemma!", comment: "")
label.layer.shadowOpacity = 0.6
label.layer.shadowColor = UIColor.black.cgColor
label.layer.shadowOffset = CGSize(width: 0, height: 2)

// render and cache the layer
label.layer.shouldRasterize = true
// make sure the cache is retina (the default is 1.0)
label.layer.rasterizationScale = UIScreen.main.scale
This produces a view that looks like this:
Keep in mind
Always set the shadowPath inside either layoutSubviews() or viewDidLayoutSubviews(). Since Auto Layout likely means there aren’t constant sizes for views, setting a shadowPath elsewhere may become outdated or incorrect.
When creating a path, the coordinate system for the path is the layer it’s applied to. To make it easier, pretend the shadow path is a subview. For this reason, we use the bounds of the view to create its shadow path.