
Just finished listening to the first season of the podcast uswithoutThem discussing the first album of mewithoutYou, A→B Life. The depth of the philosophical, historical, and musical discussions were impressively entertaining and make me appreciate the album all the more.
Sending text and files securely
My desires for sharing something like credentials are all over the place:
- End-to-end encrypted is a must, no way around it; the options for less-than-encrypted is a lot larger and well-served by e.g. my employer.
- Self-hostable because the history of this app segment revolves around shutdowns. I can spin up a new Ansible role for most containerized things in a blink.
- Command-line interface since I’m inclined to make helper scripts for most workflows.
- Easy to use for the receiver because not everybody in my life can install something on the command line, making the web the optimal delivery mechanism.
- Expiring uploads because an out-of-band send shouldn’t exist long-term and because there’s better options for perpetual file hosting.
Firefox Send was fantastic. Mozilla killed it off due to moderation issues, and likely because they’re unable to ship and maintain products that aren’t Firefox itself these days. It sets the tone for the rest of these services because it leveled up the space. I miss it.
Wormhole.app is the spiritual successor of Firefox Send but lacks a command-line interface and is not open source. Normally I’m not one to bemoan something like this being closed source and free but I’d much rather pay for a service than watch yet another thing shut down.
magic-wormhole is a great peer-to-peer-only command-line option, and I often use it to send files between my own machines and servers, but it requires both sides be online at the same time and requires installing it on the device. Wormhole.app – almost certainly stealing the name from this one – also does peer to peer through WebRTC.
FileSend by Standard Notes works well, is self-hostable, but has a rather limited scope of impact and community around it, eliminating any possible extension into the command-line world. Difficult to host publicly without allowing anonymous uploads.
Bitwarden Send is self-hostable, most easily via Vaultwarden which is what I use, supports large file sizes, has a decent command-line integration, and has a great option for text-only sends as well. The biggest issue is interface: authenticating into a Bitwarden instance via master password has to happen before you can send the files, which adds overhead to working with it both on the command line and web/clients.
Send (with many hosted instances) is a fork of the defunct Firefox Send codebase. It is also difficult to host without allowing anonymous uploads. ffsend by the same author is a capable command line interface, and supports using Basic Auth in front of the instance. In my testing, requiring auth on /api/ws is enough to prevent anonymous upload but still allow downloading.
For my personal use, I went with self-hosting Send on a cheap VPS that I’ve already got a few services running on.
Were I picking something for sharing within a team/family/company I’d probably go with Bitwarden, since it’s so extensible and likely a good choice for general password storage/sharing as well.
I’ll probably recommend Wormhole.app for one-off sends from others as long as it exists. Hopefully that’s for a little bit longer than Firefox’s attempt lasted.
IPv6 in a home environment
IPv6 addresses are broken up into two halves: the network prefix and the interface identifier. It looks something like this, in hex notation:
aaaa:bbbb:cccc:dddd:1111:2222:3333:4444
The alphabetical and bold parts of this are the network prefix and the numerical are the interface identifier.
The network prefix is then divided into a routing prefix (controlled by the ISP) and a subnet prefix (controlled by home network). ISPs will allocate a routing prefix of (in CIDR notation) /56, /60 or /64—meaning the first 56, 60 or 64 bits are reserved—and the rest are available to play with for the subnet. Routers generally request a /64 from upstream by default, which is one IPv6 network.
The interface identifier is picked by the device connecting to the network using SLAAC after being told which network prefixes are available from a router announcement. DHCPv6 is typically overkill and unnecessary on a home network.
In IPv4 a private address space like 192.168.0.0/16 is used locally and translated to a public address on the internet via NAT since there’s way too few IPv4 addresses for the number of devices that need to get on the internet. This NAT requirement also turned into a benefit in a home network as it is easier to use and memorize these shorter addresses.
Every IPv6 guide bemoans this private address desire and instead suggests adopting and using global addresses instead. The advice on the internet about IPv6 addressing is almost entirely focused on businesses who request and receive a static IPv6 prefix from a regional registry and completely overlook the benefits to home users without major infrastructure to handle configurations. However, as a home user:
- The global address may change. In fact, it’s guaranteed on my home network because the AT&T modem randomly hands out one of its non-reserved /64s depending on the mood it’s in.
- It’s a lot to memorize and type. Focusing on just the interface identifier portion is all that really matters in a local network. That part’s unlikely to change, and can be hard-coded on individual devices if desired.
Unlike IPv4, devices can and will have multiple simultaneous IPv6 addresses:
- One or two (or more) global addresses.
- One or more local addresses (ULAs). Yes, local addresses are a thing!
For global addresses, non-end-user devices will likely choose a random interface identifier and rotate it regularly to avoid external tracking. For servers and for local addresses, devices will use a modified version of their MAC address (EUI) to have a stable interface identifier.
It’s important, then, to allow devices to have a local address. This is shockingly not the default on consumer routers. The router should announce:
- A global address prefix allocated by the ISP. For example,
2001:db8:496b:942::/64. - A local address prefix. For example,
fd00::/64. There’s a suggested algorithm for generating these but that’s overkill for a home network unlikely to ever need to network with another privately. Keep it simple.
To implement this on pfSense, assuming “turn on IPv6” is checked:
- Set the WAN interface to use DHCPv6 to get a /64 prefix delegation.
- Set the LAN interface to “Track Interface” from the WAN interface.
- Add a virtual IP address (like
fd00::1/64) to the router. - Add a router announcement subnet (under DHCPv6/RA) of
fd00::/64. The one the LAN tracks will automatically be announced, even if not entered. - Set the DNS server (under DHCPv6/RA) to
fd00::1/64. - Make sure you’ve got IPv6-allowed-to-
*rules in your LAN.
The router will now periodically and when queried announce to the network which address prefixes to use, what DNS server to talk to, and various other configuration.
The LAN interface of the router can now be addressed at fd00::1 and network devices will pick stable addresses in the fd00::/64 network (e.g. fd00::a9cd:efff:feab:cdef); they can be used in configurations without worrying about changing, and IPv6 will continue to work locally even without internet.
Some devices may also advertise their own local prefixes; Thread uses IPv6 so aggressively that its devices will often send out an RA of a random local prefix if they do not pick one up on their own. Apple HomePod minis are particularly guilty of this, and it was tough to narrow down that they were the cause.
The version of less which ships in macOS Monterey (12.0) is 487, which was released in March 2017. Since then, it’s gained some features:
- Line marking. Marking a line allows you to assign a shortcut letter to it to jump back.
- Search result clearing.
- Adds a status column, to show marks and indicate lines where search results are found.
- Mouse support, so e.g. scrolling works in the document using the mouse.
At first it seemed like this may be the general problem of Apple disallowing GPL version 3 software, but less is dual-licensed to a more Apple-favorable one as well. It’s somewhat inexplicable that such a commonly-used command line library sees no updates.
Fortunately, it’s included in Homebrew. And even better, unlike the Apple distribution, they do not disable lesskey support, which allows specifying additional command and keyboard shortcuts for less to use.
Creating iOS simulators in bulk
To work around Xcode’s disinclination for creating new simulators, I wrote a script which deletes all the current simulators and then creates every possible simulator. It’s relatively straightforward because simctl has a decent JSON interface which makes processing the state a lot nicer:
#!/usr/bin/env fish

# Just to make it obvious when using the wrong version
printf "Using Xcode at %s\n\n" (xcode-select -p)

echo "Deleting all simulators..."
xcrun simctl shutdown all >/dev/null
xcrun simctl delete all >/dev/null
printf "...done\n\n"

echo "Creating new simulators..."

# You could also add 'appletv' to this list
for runtime in ios watch
    set -l runtimes (xcrun simctl list runtimes $runtime available -j | jq -c '.runtimes[]')
    for runtime in $runtimes
        set -l runtime_version (echo $runtime | jq -r '.version')
        set -l runtime_identifier (echo $runtime | jq -r '.identifier')
        set -l supported_devices (echo $runtime | jq -c '.supportedDeviceTypes[]')
        for device in $supported_devices
            set -l device_name (echo $device | jq -r '.name')
            set -l device_identifier (echo $device | jq -r '.identifier')
            set -l display_name "$device_name ($runtime_version)"
            printf \t%s\n $display_name
            xcrun simctl create $display_name $device_identifier $runtime_identifier >/dev/null
        end
    end
end

printf "...done\n\n"
The only thing missing here is device pairing – connecting a watch and phone together. Since there’s limitations around the number of devices which can be paired together, I find this a bit easier to still do manually.
Making shift-space send page up and other key mappings in iTerm2
A common problem when I am paging through less output is that, while the space key will go down a page, the shift-space shortcut does not go up. The underlying reason is terminals are strings of text and date back decades and many key combinations are archaic sequences.
Shift-space is is one of these cases. While the space key inserts visible text, the shift-space variant doesn’t have a unique character. This requires hoping particular app can handle the sequence CSI 32;2 u (which may look like ^[[32;2u; this is part of a proposal known as CSI u), or changing the key map in the terminal. I went for the latter.
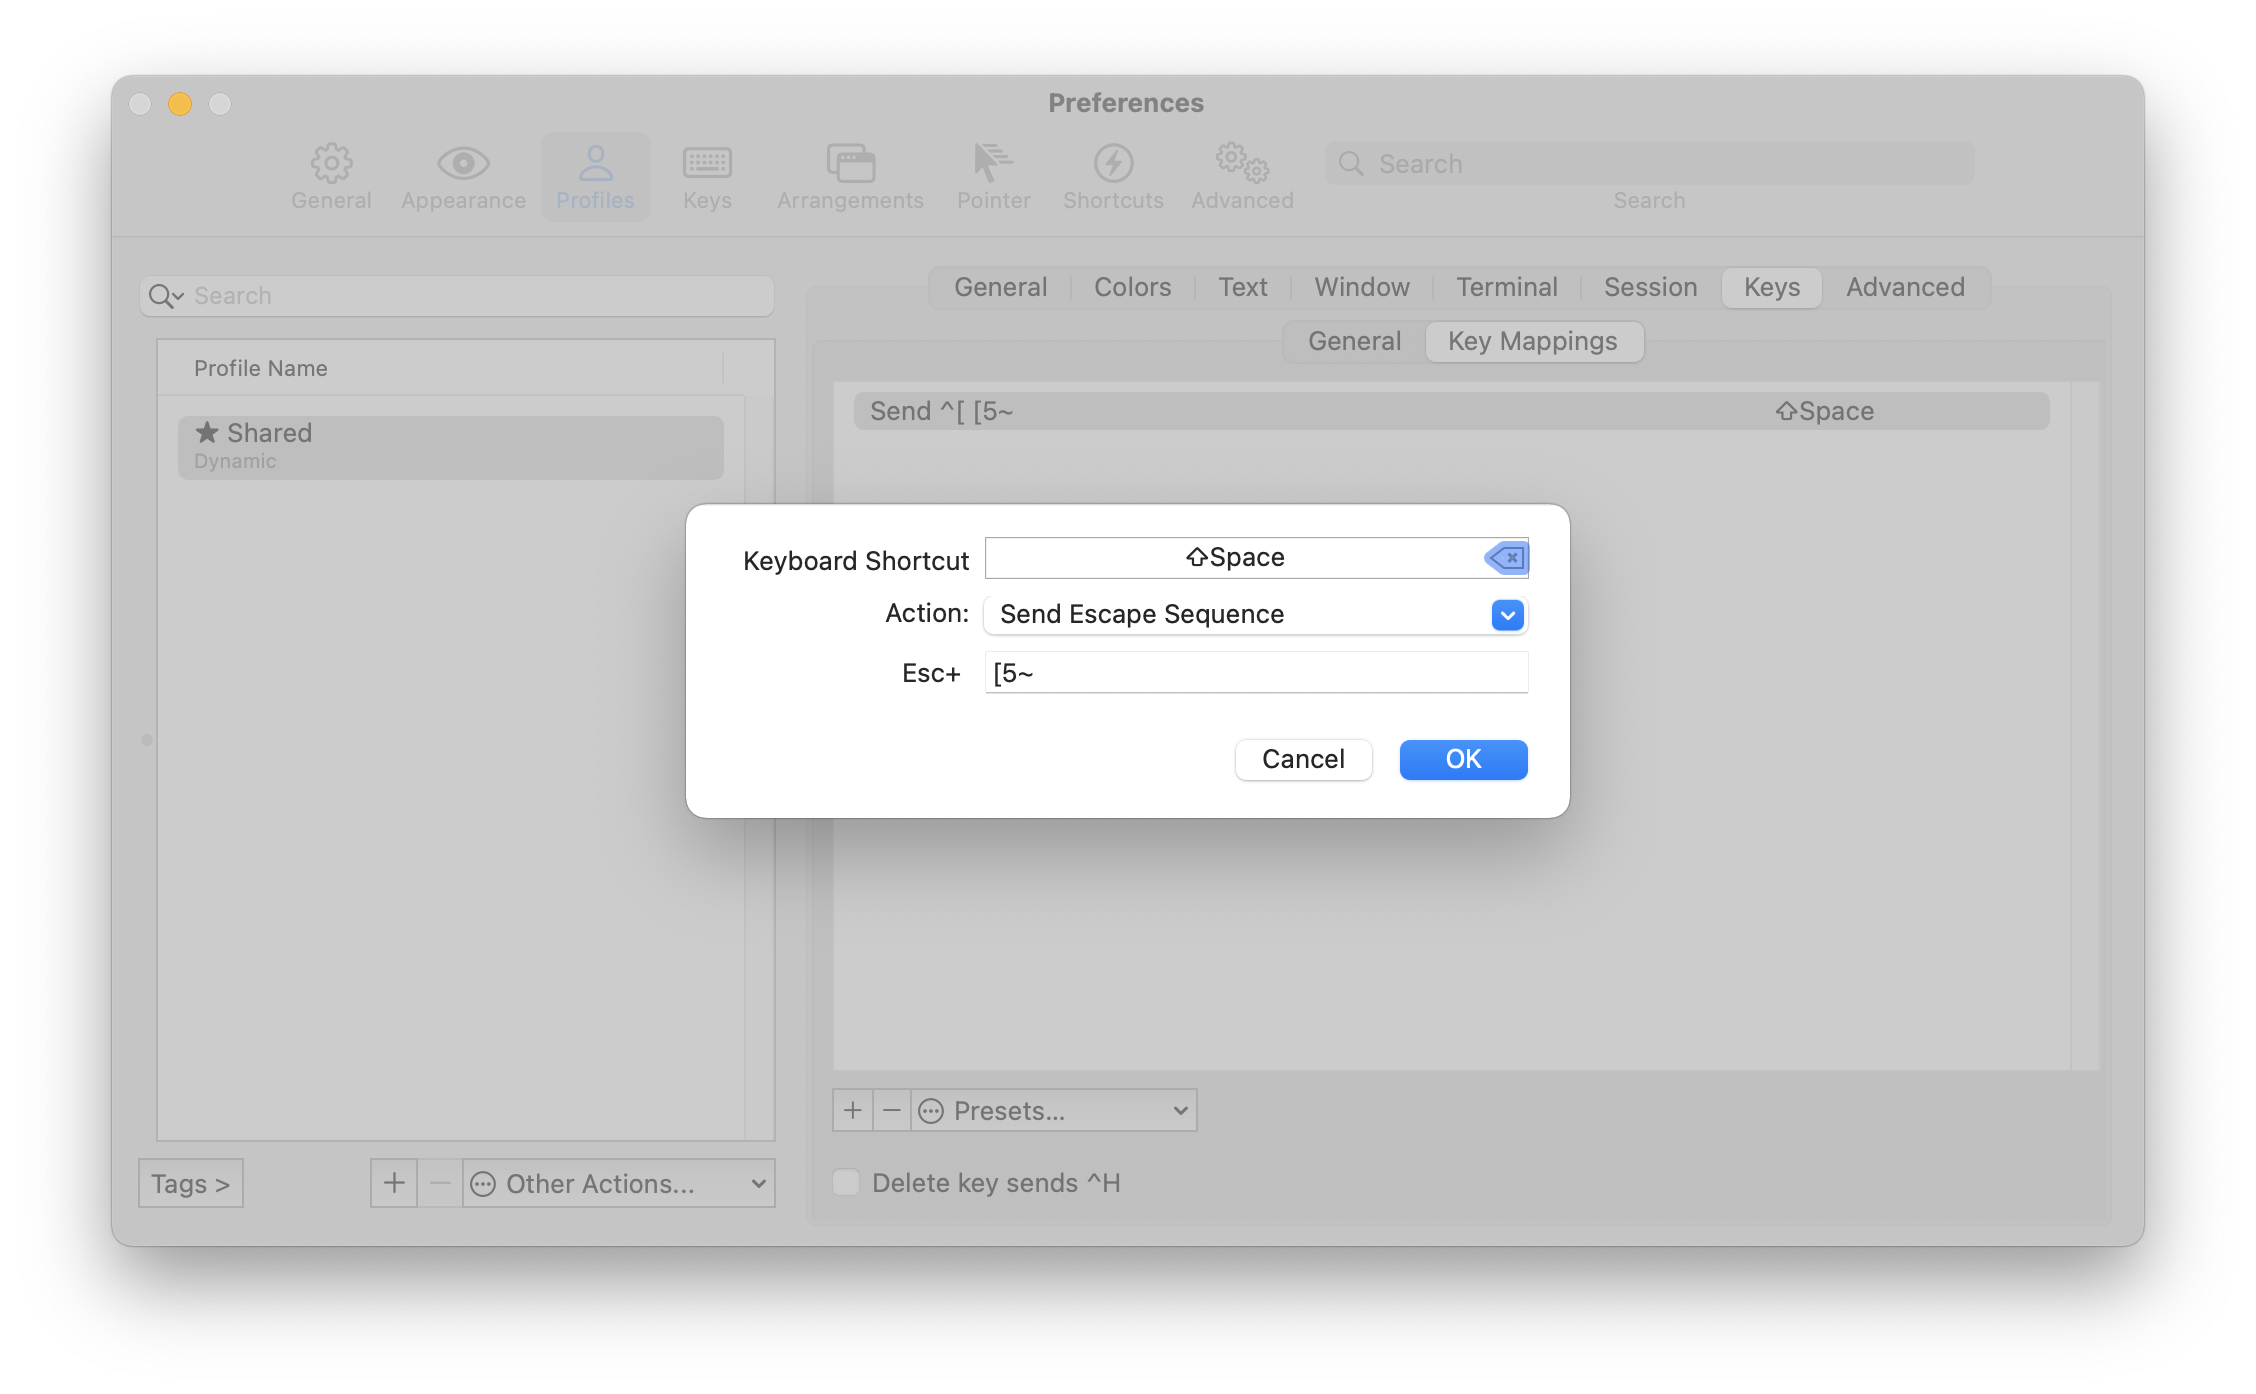
I use iTerm2, which is stellar for many reason. Its key mapping control can do what we want here, and looks like so:
You can figure out what escape sequence to send for a particular existing key combination using your shell by entering a key-reading mode and then the shortcut.
For fish, this looks like:
$ fish_key_reader
Press a key: <page up>
              hex:   1B  char: \c[  (or \e)
(  0.037 ms)  hex:   5B  char: [
(  0.018 ms)  hex:   35  char: 5
(  0.020 ms)  hex:   7E  char: ~
bind -k ppage 'do something'
bind \e\[5~ 'do something'
For bash or zsh, this looks like:
$ <ctrl-v><page up>
# transitions to
$ ^[[5~
Both of these tell us that the escape sequence is CSI 5 ~, so that’s the sequence we want to tell iTerm to send. This looks like ESC+[5~ in its UI.
iTerm2 also has Dynamic Profiles, which allows text-based management of its profile settings; this lets me keep changes intentional and preserves the history in git. Adding this same keymap there looks something like this (with other content elided):
{
  "Profiles": [
    {
      "Guid": "22b93c98-1383-440b-8224-d1c3f653a850",
      "Name": "Profile Name",
      "Keyboard Map": {
        "0x20-0x20000-0x31": {
          "Version": 1,
          "Action": 10,
          "Text": "[5~",
          "Label": "PageUp for Shift-Space"
        }
      }
    }
  ]
}
Managing preference plists under Chezmoi
Chezmoi handles my dotfiles, and it allows me to painlessly go to great levels of configuration management across machines. There’s one difficult type of configuration to deal with on Mac, though: binary .plist files.
Take Soulver, for example, which stores its font settings in UserDefaults. This results in a binary plist in ~/Library/Preferences which contains information changed on each run of the app. It is a great example of what not to check into source control.
My solution is using a modify script, which Chezmoi calls with the current version of the file looking for a modified version in response. The script for Soulver is stored in modify_private_app.soulver.mac.plist:
source "$(chezmoi source-path)/path/to/plist.sh"
pl SV_CUSTOM_FONT_NAME -string CUSTOM_FONT
pl SV_CUSTOM_FONT_POST_SCRIPT_NAME -string "Input-Regular"
pl SV_FONT_SIZE -integer 16
This is relatively stable, but more prone to breaking than a concretely-defined settings file format, of course. This uses a helper script named plist.sh which acts as a thin wrapper around plutil while minimizing the amount of boilerplate:
set -e
TMPFILE=$(mktemp)
trap "cat $TMPFILE; rm $TMPFILE" EXIT

function pl() {
    # test before setting because plutil _will_ mutate the file
    # macOS 12.+, you can use plutil like:
    # CURRENT=$(plutil -extract $1 raw $TMPFILE 2>/dev/null || :)
    CURRENT=$(/usr/libexec/PlistBuddy -c "Print :$1" $TMPFILE 2>/dev/null || :)
    if [ "$CURRENT" != "$3" ]; then
        plutil -replace $* "$TMPFILE"
    fi
}

cat <&0 >$TMPFILE

if [ ! -s $TMPFILE ]; then
    # plutil will error if it encounters an empty file
    # macOS 12.+ you can use plutil like:
    # plutil -create binary1 $TMPFILE
    echo "{}" | plutil -convert binary1 -o $TMPFILE -
fi
Now my Soulver settings are synced and updated using Chezmoi, and I don’t have to keep track of which apps I need to visit if I decide I want to play with a different font.
I recently looked at every programming font I could find; here are my favorites in order:
Technical debt that lasts forever
I noticed that ls output is sorted case-sensitively on macOS; that is, “abc” is sorted after “Xyz.” It doesn’t appear there are any mechanisms to get ls to do a case-insensitive sort, either. To work around this in a script I was writing, I looked to sort to do this for me, and stumbled upon the always-confusing flag:
-f,--ignore-case: Convert all lowercase characters to their uppercase equivalent before comparison, that is, perform case-independent sorting.
Which brings about the question: what does -f have to do with case-insensitive sorting? The answer to this part of the mystery is more apparent in the coreutils version, which describes it as:
-f,--ignore-case: fold lower case to upper case characters
So the -f short-form flag is for “fold.” Case folding is a mechanism for comparing strings while mapping some characters to others, or in this case mapping lowercase to uppercase using Unicode’s Case Folding table.
The long-form version of this flag was added in 2001, citing as “add support for long options.” The short-form version was added in 1993, likely for compatibility with some pre-existing Unix version. The first version of the POSIX standard in “Commands and Utilities, Issue 4, Version 2” (1994, pg. 647) doesn’t even use the word “fold,” defining it as:
-f: Consider all lower-case characters that have upper-case equivalents, according to the current setting of LC_CTYPE, to be the upper-case equivalent for the purposes of comparison.
Sadly, the oldest version of sort that I can find is from 4.4BSD-lite2, which describes it the same as macOS does now, also without the word “fold” in sight. I’m guessing some older, more ancient documentation for proprietary Unix is floating around somewhere that describes the flags, too.
Amusingly, the option you’d think would be the case-insensitive comparison flag, -i, is instead “ignore all non-printable characters.” This is a great example of picking a precise-but-confusing name for something and getting stuck with it until the end of time.
Fixing slow Firefox loading when using Pi-Hole
I run Pi-Hole to prevent clients on my network from loading dangerous or gross things like advertisements or tracking scripts. This normally works great: it functions on all devices without requiring configuration and I don’t need to think about it too often.
I’ve also been using Firefox a lot more often lately, partly because Big Sur introduced a lot of Safari regressions and sites like Twitter are broken regularly, and partly because I like the features it’s coming out with like HTTPS-only mode.
Unfortunately, Firefox and Pi-Hole do not play nicely together when it comes to certain websites. For example, when loading sfchronicle.com several of its trackers have performance issues:
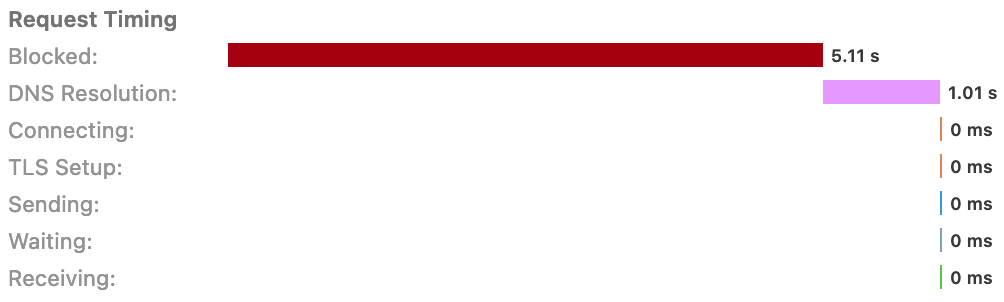
When Firefox comes across a host which resolves to 0.0.0.0, it appears to have some kind of internal retry mechanism that, combined with HTML’s sequential loading of scripts, causes a cascading set of delays making loading take an extremely long time.
Fortunately, Pi-Hole’s behavior of returning 0.0.0.0 for disallowed hosts is configurable. Changing its BLOCKINGMODE to NODATA changes the resolution behavior from:
$ dig +noall +question +answer secure.quantserve.com
  ;secure.quantserve.com.   IN  A
  secure.quantserve.com.  2 IN  A 0.0.0.0
to:
$ dig +noall +question +answer secure.quantserve.com
  ;secure.quantserve.com.   IN  A
Instead of providing an IP address, the response we get is instead that there are no A records for the domain, and Firefox gives up a lot faster, taking a few milliseconds instead of a few seconds. The Pi-Hole documentation on blocking modes provides a caveat:
…experiments suggest that clients may try to resolve blocked domains more often compared to
NULLblocking…
The default blocking behavior (NULL) is returning 0.0.0.0. I have not come across any issues with this change, but I also don’t think I’d notice if DNS requests drastically increased on my network.
This doesn’t resolve all of the performance issues on the SF Chronicle in Firefox. Even using a non-Pi-Hole DNS server shows significant loading delays compared to Safari. This, at least, makes it painful instead of frustrating. As an aside, I am resentful that I’m paying $12 per month for a website that wants to inject the scummiest of Taboola-level ads on me.
First, from The Dragonbone Chair:
“Ko muhuhok na mik aqa nop, we say in Yiqanuc: ‘When it falls on your head, then you are knowing it is a rock.’”
“‘Mikmok hanno so gijiq,’ we say in Yiqanuc!” Binabik called. “‘If you wish to carry a hungry weasel in your pocket, it is your choice!”
A ponderous one from The Banished of Muirwood:
Your mind is your predicament. It wants to be free of change. Free of pain, free of the obligations of life and death. But change is law and no amount of pretending will alter that reality.
One that made me cry from Artemis:
“What’s up, Dad? You’re slow as snot today.”
“Just being thorough.”
“Are you kidding? I’ve seen you fire up a torch with one hand and set mixture levels with the other at the same time. Why are you—”
Oh. I stopped talking. This wasn’t a normal job. Tomorrow, his daughter’s life would rely on the quality of these welds. It slowly dawned on me that, to him, this was the most critical project he’d ever done. He would accept nothing short of his absolute best. And if that meant taking all day, so be it. I stood back and let him work. After more fastidious double checks, he got started. I assisted and did what I was told. We may have our friction, but when it came to welding he was the master and I was the apprentice. Very few people get a chance to quantify how much their father loves them. But I did. The job should have taken forty-five minutes, but Dad spent three and a half hours on it. My father loves me 366 percent more than he loves anything else. Good to know.
One that makes me ponder from City of Miracles:
What a tremendous sin impatience is, he thinks. It blinds us to the moment before us, and it is only when that moment has passed that we look back and see it was full of treasures.
One that made me laugh from Gardens of the Moon:
“It will be a fine day for a walk, pronounces Kruppe, who is wise in all things.”
– Kruppe (of course)
And finally one that reminds me enough of San Francisco that I couldn’t help but stop and think from The City Stained Red:
This city is sick, his father had once told him. It eats people and craps out gold and people pick the filth up off the city streets and shove it in their faces and smear it on their lips.
I created iosfontsizes.com, a quick way to glance at the dynamic type sizes Apple predefines. It’s an evolution of a Gist I created which I’ve been referring to for years, but now with the added benefit of an extremely memorable URL.
Robert Jackson Bennett, author of City of Stairs, wrote author notes for the book:
Every once in a while – mostly due to reader comments – I find myself wondering if the present tense is worth writing in. But the opening sequence to this chapter dispels any such thoughts from my mind.
and
Seriously, I forgot how fucking creepy Jukov is.
Standard Notes is an end-to-end encrypted notes syncing application built for longevity:
Our revolutionary, paradigm-shifting 21st-century business plan is to keep your information ready for the 22nd century. The notes you write now should be there for you in a 100 years. That’s our killer app.
It’s one of the rare times when I value function over form. It’s an ugly application, feeling wholly unnative and lacking in important things like keyboard shortcuts. Why keep using it? There’s no other service that can sync my notes with zero knowledge across devices.
One of the bigger holes–not being able to attach and sync files–is partially filled today with the release of FileSafe:
When you use FileSafe, you attach files[…]to your individual notes. These files are then encrypted by Standard Notes offline (client-side) first, then uploaded in their encrypted form to your Dropbox, Google Drive, or WebDAV compliant server (Nextcloud, ownCloud, Seafile, Synology, and others).
It’s barebones. You can upload to a note and download from a note. There’s no previews, no inlining. It doesn’t work on mobile yet. It’s not what you would expect out of attaching a file to a note.
Privacy is such a strong differentiator.
Another risk for generic TLDs: your registry may turn the TLD into a spam-filled mess which permanently ruins your domain.
This documentary/ad from AT&T in the 1970s has Bell Labs employees introduce and describe how Unix differs from other operating systems, as well as about the ethos of Unix.
Related is the Computerphile interviews with Brian Kernighan who participated in this era of Bell Labs (and this video quite excellently).
It’s impressive how they managed to build so much fundamental concepts and designs in such a short period of time. Much of the computing world is still based on how those original Unix programs were written and the decisions of those working in Bell Labs.
The Style Guide for Google’s open-source projects includes some interesting recommendations that I hadn’t seen before, including:
For file size optimization and scannability purposes, consider omitting optional tags. The HTML5 specification defines what tags can be omitted.
This includes tags like <html>, <head>, and <body> as well as closing tags for elements like </li> and </p>. The difference can be rather stark. An extremely basic page may look like:
<!DOCTYPE html>
<title>A page about nothing</title>
<h1>Introduction</h1>
<p>Also the conclusion.
Alignment rects in Auto Layout views
In the UIView documentation, Apple describes alignment rects:
The constraint-based layout system uses alignment rectangles to align views, rather than their frame. This allows custom views to be aligned based on the location of their content while still having a frame that encompasses any ornamentation they need to draw around their content, such as shadows or reflections.
At first glance, this feature feels unnecessary: views can draw outside their bounds seemingly without performance issues1. However, the differentiation between frame and alignment is a powerful, and easily overlooked, feature in Auto Layout.
Automatic with constraints
Views that use Auto Layout for positioning and sizing get alignment rect support for free via alignmentRectInsets. Unfortunately, going by the documentation, this is not evident2.
Let’s work through this using an example. The vertical line is going down the exact center of the container:
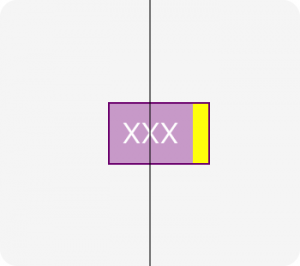
This view has a label and decorative yellow box to the side. Notice that we’re centering relative to the label, and not to the decorative box. This is accomplished with a very small amount of code:
override var alignmentRectInsets: UIEdgeInsets {
  return UIEdgeInsets(top: 0, left: 0, bottom: 0, right: 10)
}
The constraints within the view can completely ignore this fact. With the insets set, the layoutMarginGuide and direct leading, trailing, etc., anchors are automatically inset. This is also true for constraints created via NSLayoutConstraint.
The entirety of the positioning for the view above looks like this:
label.translatesAutoresizingMaskIntoConstraints = false
NSLayoutConstraint.activate([
  label.leadingAnchor.constraint(equalTo: layoutMarginsGuide.leadingAnchor),
  label.trailingAnchor.constraint(equalTo: layoutMarginsGuide.trailingAnchor),
  label.topAnchor.constraint(equalTo: layoutMarginsGuide.topAnchor),
  label.bottomAnchor.constraint(equalTo: layoutMarginsGuide.bottomAnchor)
])

// alignmentRectInsets doesn't support RTL,
// so use left/right rather than leading/trailing
yellowBox.translatesAutoresizingMaskIntoConstraints = false
NSLayoutConstraint.activate([
  yellowBox.topAnchor.constraint(equalTo: topAnchor),
  yellowBox.bottomAnchor.constraint(equalTo: bottomAnchor),
  yellowBox.leftAnchor.constraint(equalTo: rightAnchor),
  yellowBox.widthAnchor.constraint(equalToConstant: alignmentRectInsets.right)
])
We can now apply whole-view effects, like the border in the example above, without having to create elaborate view hierarchies. The decoration is part of the view, not floating outside of it.
The only downside here is that alignmentRectInsets does not use the new NSDirectionalEdgeInsets introduced in iOS 11, so right-to-left support may need to look at effectiveUserInterfaceLayoutDirection.
Tappability
Apple recommends 44pt tappable areas for controls which are often designed to be aligned with other elements on the screen, often times closer than this tappable region.
To combat this problem, a common solution is overriding hitTest(_:with:) on the button to allowing it to tapped outside of its frame. This makes it hard to visualize where a screen is tappable when debugging the view.
Let’s solve this problem using alignment rects. A custom UIControl subclass can use the regular insets like the view example above. Unfortunately, UIButton does not use Auto Layout internally, so a small subclass is needed to handle the insets:
class IncreasedTappableButton: UIButton {
  // one potential optimization is to calculate insets that would
  // make the button >= 44.0 pt tall/wide
  override var alignmentRectInsets: UIEdgeInsets {
    return UIEdgeInsets(top: 10, left: 10, bottom: 10, right: 10)
  }

  override var intrinsicContentSize: CGSize {
    var size = super.intrinsicContentSize
    size.width += alignmentRectInsets.left + alignmentRectInsets.right
    size.height += alignmentRectInsets.top + alignmentRectInsets.bottom
    return size
  }

  private var boundsInsetByAlignmentRect: CGRect {
    return UIEdgeInsetsInsetRect(bounds, alignmentRectInsets)
  }

  override func backgroundRect(forBounds bounds: CGRect) -> CGRect {
    return super.backgroundRect(forBounds: boundsInsetByAlignmentRect)
  }

  override func imageRect(forContentRect contentRect: CGRect) -> CGRect {
    return super.imageRect(forContentRect: boundsInsetByAlignmentRect)
  }

  override func titleRect(forContentRect contentRect: CGRect) -> CGRect {
    return super.titleRect(forContentRect: boundsInsetByAlignmentRect)
  }
}
This gives us a button where the frame is slightly bigger, but things are positioned relative to the original size:
It is worth pointing out that this will not work inside a UIStackView since the larger frame will extend outside the bounds of its container and UIStackView is fairly aggressive about ignoring outside touches.
If outside views are opaque and do not cause blending or offscreen rendering, it does not appear there are any additional costs to having subviews drawing outside bounds.
-
I’ve spent hours searching for documentation about the performance impact of drawing outside bounds, and there’s not a lot of detail available. ↩︎
-
Often in Apple SDKs, the headers contain information the documentation is missing. This is from the UIView headers:
Constraints do not actually relate the frames of the views, rather they relate the “alignment rects” of views. This is the same as the frame unless overridden by a subclass of UIView.
I did not notice this and I am sure many others are missing this key piece of documentation. ↩︎
Doctors Without Borders uses drones to plan their operations by mapping people and infrastructure. What a smart use of of the technology. In places where accurate maps aren’t available, they generate them.
Better shadow performance on views
There are two different uses for the shadowPath property on CALayer:
- Improving the performance of having a shadow
- Creating shadows that don’t match the contents of the view. Check out Apple’s Using Shadow Path for Special Effects.
For performance reasons, always set a shadowPath. This is a substantial improvement, especially if the view changes position via animation or presence in a scroll view.
When you can set a path
The shadowPath tells the system what should be casting a shadow without having to look at the contents of the view itself. Since most views that need a shadow are opaque, we just need to describe the appearance of the background of the view.
Using the convenience initializers on UIBezierPath we can create ovals, squares and rounded rectangles without difficulty. For more complicated paths, check out A Primer on Bézier Curves. You can still use UIBezierPath or CGPath to create them, but it will require more complicated math.
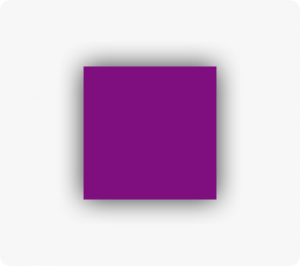
Starting with a simple, purple view with a shadow:
let purpleView = UIView()
purpleView.backgroundColor = .purple
purpleView.layer.shadowRadius = 10.0
purpleView.layer.shadowColor = UIColor.black.cgColor
purpleView.layer.shadowOffset = CGSize()
purpleView.layer.shadowOpacity = 0.8
We can tell the system to draw a shadow for the entire square:
purpleView.layer.shadowPath = UIBezierPath(rect: purpleView.bounds).cgPath
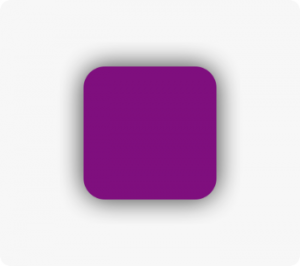
For rounded corners, we can set the cornerRadius property on the layer, and create a matching shadowPath:
purpleView.layer.cornerRadius = 16.0
purpleView.layer.shadowPath = UIBezierPath(roundedRect: view.bounds, cornerRadius: 16.0).cgPath
When you can’t set a path
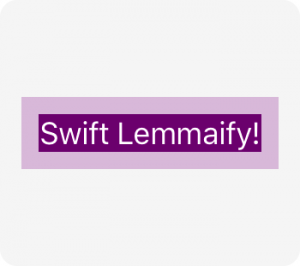
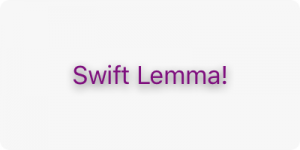
Sometimes it’s not possible to set a path because there’s no easy way to describe the contents of the view. For example, text is a mess of random contents. Rasterizing the layer avoids having to draw the shadow repeatedly.
// create our label
let label = UILabel()
label.textColor = .purple
label.text = NSLocalizedString("Swift Lemma!", comment: "")
label.layer.shadowOpacity = 0.6
label.layer.shadowColor = UIColor.black.cgColor
label.layer.shadowOffset = CGSize(width: 0, height: 2)

// render and cache the layer
label.layer.shouldRasterize = true
// make sure the cache is retina (the default is 1.0)
label.layer.rasterizationScale = UIScreen.main.scale
This produces a view that looks like this:
Keep in mind
Always set the shadowPath inside either layoutSubviews() or viewDidLayoutSubviews(). Since Auto Layout likely means there aren’t constant sizes for views, setting a shadowPath elsewhere may become outdated or incorrect.
When creating a path, the coordinate system for the path is the layer it’s applied to. To make it easier, pretend the shadow path is a subview. For this reason, we use the bounds of the view to create its shadow path.
Layout margins within a UIStackView
The UIStackView property isLayoutMarginsRelativeArrangement allows insets similar to margin constraints on subviews in a UIView.
Let’s consider a simple single-subview example:
let containedView = UIView()
containedView.backgroundColor = .purple

let stackView = UIStackView()
stackView.addArrangedSubview(containedView)
You can then configure directionalLayoutMargins and enable them like so:
stackView.directionalLayoutMargins = NSDirectionalEdgeInsets(
    top: 8,
    leading: 8,
    bottom: 8,
    trailing: 8
)
stackView.isLayoutMarginsRelativeArrangement = true
This is what it looks like, before and after: